Imagine starting your day with a perfectly crafted latte, cappuccino, or flat white, right from the comfort of your own home. For coffee enthusiasts and home baristas, this dream is within reach. Learning how to froth milk using a coffee machine is a game-changer, elevating your coffee-making skills to new heights. In this guide, we'll walk you through the process of frothing milk with a manual coffee machine, explain different methods of stretching milk, and teach you how to achieve the optimal milk temperature. Let's get started!
Why Milk Frothing Enhances Your Coffee Experience
Frothing milk adds a luxurious texture to your coffee drinks. The creamy microfoam creates a rich mouthfeel that complements the bold flavors of espresso. Whether you're making a latte, cappuccino, or macchiato, properly frothed milk can make all the difference. Plus, it opens the door to creating beautiful latte art, impressing guests and enhancing your coffee rituals.
Understanding the Basics of Milk Frothing
Before we jump into the techniques, it's essential to understand the basics. Frothing milk involves introducing air into the milk to create foam, and heating it to the right temperature. The goal is to achieve a silky, velvety texture that blends seamlessly with your espresso.
Selecting the Right Milk
The type of milk you use significantly impacts the quality of the foam. Whole milk is ideal because its higher fat content creates a creamier texture. However, if you prefer lower-fat options or plant-based milks, they can also be frothed with some minor adjustments.
Equipment You Need
To froth milk, you'll need:
- A coffee machine with a steam wand.
- A stainless steel milk frothing pitcher.
- A thermometer (optional, but helpful for beginners).
Preparing Your Coffee Machine
Proper preparation is key to successful milk frothing. Ensure your coffee machine is clean and ready to go.
Purge the Steam Wand
Start by purging the steam wand. Turn it on for a few seconds to release any water trapped inside. This step ensures you're working with dry steam, which is essential for creating high-quality foam.
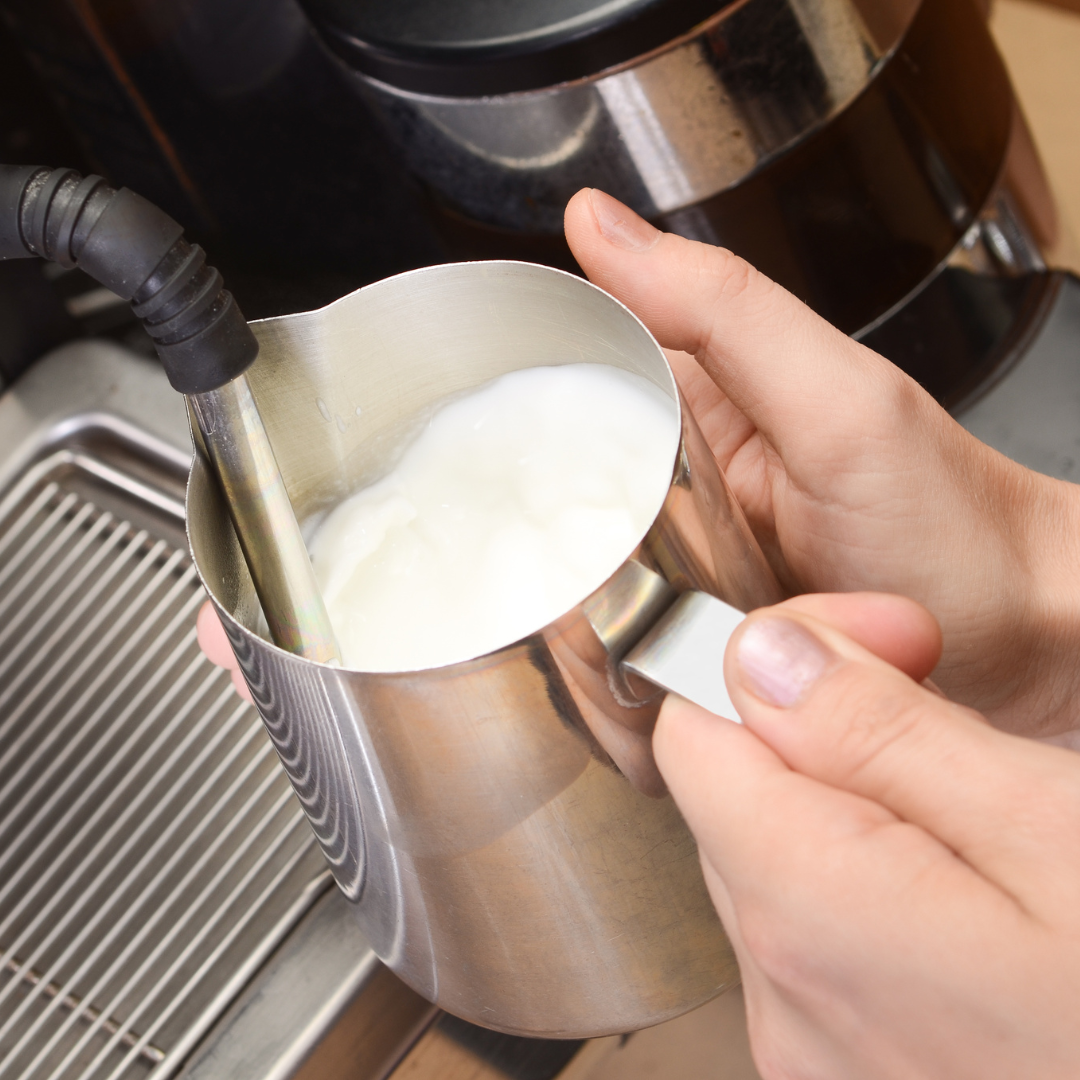
Positioning the Wand
Submerge the steam wand in the milk, positioning it just below the surface. This placement is crucial for introducing air into the milk.
The Two Phases of Frothing Milk
Frothing milk involves two main phases: stretching and texturing. Each phase contributes to achieving the perfect microfoam.
Stretching the Milk
Stretching, or aerating, is the first phase. It's about adding air to the milk to create foam. Here's how to do it:
- Start with cold milk. Fill your frothing pitcher about one-third full.
- Turn on the steam wand and position it just below the milk's surface.
- Listen for a hissing sound. This indicates air is being introduced.
- Keep the wand in this position until the milk doubles in volume.
Texturing the Milk
Once you've stretched the milk, it's time to texture it. This phase involves heating the milk and incorporating the air to create a smooth, silky texture.
- Submerge the steam wand deeper into the milk.
- Tilt the pitcher slightly to create a whirlpool effect.
- Continue steaming until the milk reaches the desired temperature, around 150-155°F (65-68°C).
- Turn off the steam wand and wipe it clean immediately to prevent milk residue buildup.
Achieving the Optimal Milk Temperature
Heating milk to the right temperature is crucial for both taste and texture. Overheating can scorch the milk, while underheating results in a flat, unimpressive foam.
Why Temperature Matters
Temperature affects the milk's sweetness and the stability of the foam. Aim for a temperature between 150-155°F (65-68°C). This range brings out the milk's natural sweetness and ensures a creamy consistency.
Using a Thermometer
For beginners, using a thermometer can be incredibly helpful. Insert it into the pitcher while frothing and keep an eye on the temperature. Over time, you'll develop a feel for the right temperature without needing a thermometer.
Common Milk Frothing Mistakes and How to Avoid Them
Even experienced baristas encounter challenges when frothing milk. Here are some common mistakes and tips to avoid them.
Overheating the Milk
Overheated milk loses its sweetness and can develop a burnt taste. To avoid this, keep the steam wand moving and turn it off as soon as you reach the optimal temperature.
Incorrect Wand Positioning
If the steam wand is too deep or too shallow, you'll struggle to achieve the right texture. Practice positioning the wand just below the milk's surface during stretching and deeper during texturing.
Neglecting Steam Wand Maintenance
Milk residue can clog the steam wand, affecting performance and hygiene. Always wipe the steam wand immediately after use and purge it before and after frothing.
Experimenting with Different Milk Types
While whole milk is the gold standard for frothing, experimenting with different milk types can be fun and rewarding.
Skim Milk
Skim milk froths well but produces a lighter, less creamy foam. It's a great option for those who prefer a lower-fat diet.
Plant-Based Milks
Almond, soy, and oat milk are popular plant-based options. Each has its unique characteristics, so experiment to find your favorite. Note that plant-based milks may require slightly different techniques.
Creating Latte Art
Once you've mastered milk frothing, you can take your skills to the next level by creating latte art.
Pouring Techniques
Pouring technique is key to creating beautiful designs. Start with a slow pour to mix the milk and espresso, then increase the speed to form patterns.
Basic Designs
Start with simple designs like hearts and rosettas. With practice, you can create more intricate patterns like tulips and swans.
Practicing Patience
Latte art requires patience and practice. Don't be discouraged if your first attempts don't look perfect. Keep practicing, and you'll improve over time.
Integrating Frothed Milk into Different Coffee Drinks
Now that you can froth milk like a pro, let's explore how to use it in various coffee drinks.
Lattes
Lattes consist of a shot of espresso topped with steamed milk and a small layer of microfoam. The rich, creamy texture makes lattes a favorite among coffee lovers.
Cappuccinos
Cappuccinos have equal parts espresso, steamed milk, and microfoam. The foamier texture sets cappuccinos apart from lattes.
Flat Whites
Flat whites feature a shot of espresso with a thin layer of velvety microfoam. The result is a strong coffee flavor with a silky mouthfeel.
Troubleshooting Frothing Issues
Encountering issues while frothing milk is normal. Here are some solutions to common problems.
Bubbles in the Foam
Large bubbles indicate too much air was introduced during stretching. Adjust the wand position and focus on creating a smooth, consistent texture.
No Foam
If your milk isn't frothing, it might be too old or too warm. Always start with fresh, cold milk.
Inconsistent Texture
Inconsistent texture often results from improper wand positioning or movement. Practice makes perfect, so keep refining your technique.
Tips for Maintaining Your Coffee Machine
Proper maintenance of your coffee machine ensures consistent performance and longevity.
Regular Cleaning
Clean the steam wand after every use and perform regular deep cleanings. Follow the manufacturer's instructions for best results.
Descaling
Descale your machine periodically to remove mineral buildup. This keeps your machine running smoothly and prevents damage.
Checking for Wear
Regularly inspect your machine for signs of wear and tear. Replace any worn parts promptly to maintain optimal performance.
Frothing milk using a coffee machine is an essential skill for any coffee enthusiast or home barista. By following the steps outlined in this guide, you'll master the art of milk frothing, enhance your coffee experience, and impress your friends with your barista skills. Remember, practice makes perfect, so keep experimenting and refining your technique.